
The wheel, something that the cavemen were renound for coming up with....and given how good this recipe tastes, it deserves to share the title!
I always try to experiment with quite differing paleo treats, that offer a new and different taste experience....this one doesnt disappoint! Ive never even tried figs before this recipe, but loved the stickiness of them once they were cooked and the texture with the little seeds that you discover in each bite.
The almond dough offers a soft, crumbling, sweet taste to the recipe when baked. When this is mixed with the sweet taste of the figs its an absolute winner.
The ingredients for around 15-18 paleo fig wheels are as follows;
SWEET ALMOND DOUGH
3 cups of ground almonds
2 eggs
1/2 cup of pure maple syrup
1/2 teaspoon of vanilla extract
1/2 teaspoon of almond extract
1/2 cup of coconut oil
FIG FILLING
1 cup of figs
1/2 cup of cranberry juice
1 teaspoon of agave nectar
BE AWARE THAT SOAKING THE FIGS IN STEP ONE REQUIRES AT LEAST AN HOUR, THIS CAN HOWEVER BE LEFT FOR LONGER...
FIG FILLING
STEP 1 - slice up your cup of figs and add them to a bowl with the cranberry juice. Place in the fridge and leave for an hour.
STEP 2 - Once the hour has passed, heat up a saucepan and cook your figs/juice combo at a temperature that allows it to gently bubble. You are looking for the figs breaking down a little and becoming softer. I did this on a moderate heat for around 10 mins, checking constantly.
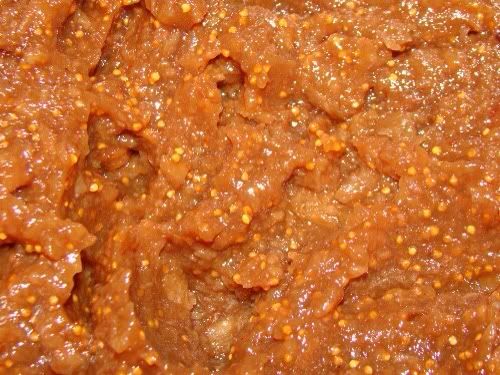
STEP 3 - allow a little time for your figs and juice to cool before putting it into a food processor. This is where we blend the mixture to make our smooth filling. Pulse until you cannot see any parts of fig and it is more of a paste. Whilst this is taking place add a teaspoon of agave nectar to the bowl and allow it to mix in thoroughly. You want it to look something like this...
STEP 4 - Now into a fresh bowl, add your eggs, maple syrup, vanilla and almond extract. Mix this well with a hand whisk. Add you ground almonds to this and again mix until it becomes one.
STEP 5 - melt your coconut oil and add this to your mixed almond dough, again mix it all together until its one.
STEP 6 - The dough will seem a little too loose at this point, dont worry its meant to be like that. If its not looking right at all it may be that youve got too much liquid in there, from larger eggs for example. Its not a problem, just add a little more ground almond to the mix to thicken it up. Bear in mind for this recipe to work you need to roll this dough up like a swiss roll.
STEP 7 - put down a sheet of greaseproof paper, put your dough on top. Put a sheet of greaseproof paper on top of the dough and start to roll it flat between the two. You dont want this too thin as it will simply break when you try to roll it. Use your judgement, but its best to have a thickness of around 1/3 of an inch.
STEP 8 - Once this has been rolled out flat, leave it between the sheets and put it into the freezer for 30 mins to an hour to bind together. This may seem like a pain, but believe me its easier than trying to roll dough thats not set and is going everywhere.
STAGE 9 - after the time in the freezer remove the top sheet of greaseproof paper from your dough. Turn it over onto a breadboard/silicone sheet then peel off the other sheet of the greaseproof paper.
STEP 10 - Go back to your fig mixture and spoon it all over your almond dough in a generous layer. Make sure your not TOO generous as you wont be able to roll it up properly.
STEP 11 - GENTLY roll your dough with fig filling up on itself like a swiss roll. It should look something like this...

STEP 12 - Turn on your oven to 190degrees at this point, get out a further sheet of greaseproof paper and a baking tray.
IRONICALLY....STEP.....13 - now....with a sharp knife....slice your long roll into individual 1 inch or more thick wheels. I can safely say that after all of the effort l had gone to with this it was like l was slicing on the Masterchef Final !!! What l would say is that this mix makes alot of wheels, so dont worry if your first few come out a little squashed. The trick is to use a sharp knife and to use long strokes to cut. If you saw at it, you will end up with something that resembles a Figgy Frankenstein which doesnt have the appeal of the finished article that l got (after practice). Hopefully they look like this....
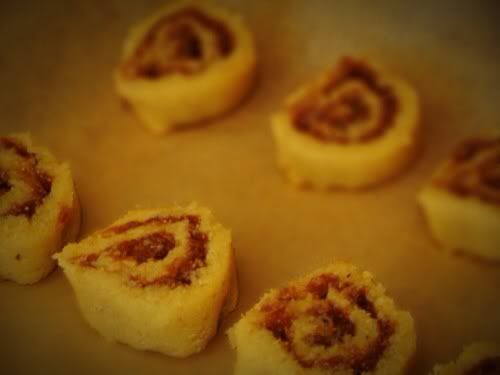
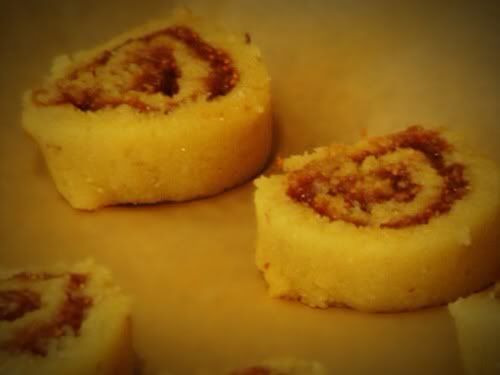
STEP 14 - Once sliced, space out evenly onto your taking tray thats lined with the greaseproof paper. Put into the oven thats pre heated and allow to cook for around 10-15 mins or until golden brown. They cook so quickly that l (sadly) sat and watched them through the oven door to make sure that they didnt burn. The cooking time depends on the thickness of the wheels that you have cut, if your more comfortable take the temp down to 150 and allow it to cook for longer. Just be aware that this MAY effect the end visual result with the risen edges of the cooken dough and the figgy troughs (yum, yum)
STEP 15 - tuck in and have a taste
This recipe requires a little prep, with soaking the figs and allowing the dough to bind together in the freezer but the results are well worth it. You can obviously change the fruit filing to something like apples or strawberries to mix the taste up, but l have to admit im now a fan of the fig!
Yet again another little recipe that can go into your paleo lunchbox for those busy people commited to the paleo journey. A fantastic find in the awesome book MAKE IT PALEO by BILL STALEY and HAYLEY MASON (with a few little changes.)


No comments:
Post a Comment