
This recipe was a new one for me...and l was very pleasantly surprised by the flavour that it delivered. For me, l always try to have paleo based treats that come close to "normal" treats that l miss. This is now amoung them, adapted from Kristin Jekieleks recipe at FAST PALEO.
Ill be honest, l love after eight mints. When Christmas comes each year you can easily sign me up for a few boxes of them and ill happliy tuck in, they are one of the things that l miss through paleo...this peppermint recipe has now solved that issue for me.
For this recipe you can form the "patties" however you want, l found the suggested Jaffa cake size patty a bit big, so l have made mine into bars. Snack size, just enough and a good sweet fix!
For those of that need it or would like a simple walk through of the recipe you can find it by clicking HERE or by visiting the VIDEO BAR on the right of this page. Please note that this recipe is split into 2 videos, one for the interior peppermint preparation, another for the chocolate coating.
The ingredients for these, that made me 9 bars are as follows;
1/2 cup of coconut oil
1/2 cup of coconut butter
1/4 cup of Agave nectar
1 teaspoon of peppermint oil
100g bar of 85% dark chocolate
STEP 1 - measure out your coconut oil and coconut butter. Put them together, into a cup and into the microwave for around a minute and a half.
STEP 2 - during STEP 1, measure out your Agave Nectar and peppermint oil and combine in a glass bowl....add a few extra drops of peppermint oil for a little extra minty kick if required.
STEP 3 - once you are happy that the coconut butter/oil is broken down and in a liquid state pour it into the bowl containing the other ingredients and mix in with a whisk until the mix thickens.
STEP 4 - pour your mix into moulds/onto a flat tray depending on what form you would like the peppermint to take. I would suggest trying the recipe with a silicone ice cube/bar tray as the next stage may get a little tricky if you have a tray full of thin flat mix. You could also put some into a bun tray to take shape if that helps.
STEP 5 - place into the freezer for 60-90 mins until the mixture has hardened.
Prep time is around 10 mins up to this point. When you remove the bars from the freezer to check they have set, If the mixture breaks off into bits or crumbles you know it hasnt been given long enough. If thats the case pop it back in the freezer for a while. If your in no rush, overnight, or in the morning to complete the 2nd stage of the recipe may be a good idea.
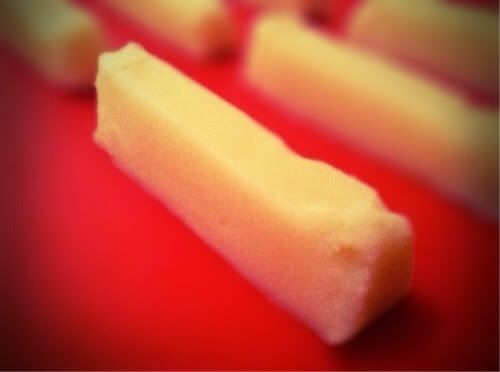
STEP 6 - remove your set peppermint bars from the freezer, pop out of the moulds with some care and place onto a silicone sheet or some greaseproof paper. If you have any trouble getting the formed peppermint out of the moulds, just get a knife with a warmed blade and cut around the edges and they should drop out.
They should look something like these bad boys
Now comes the messy part...For those of that need it or would like a simple walk through of this stage of the recipe you can find it by clicking HERE or by visiting the VIDEO BAR on the right of this page.
STEP 7 - have a few inches of boiling water in a saucepan, place a glass boil that just fits into the top of the saucepan on top. The idea of this is that there is a cavity between the boiling water and the glass bowl so that we are using steam to melt your chocolate. Now break your bar of chocolate into small pieces and place it into the glass bowl.
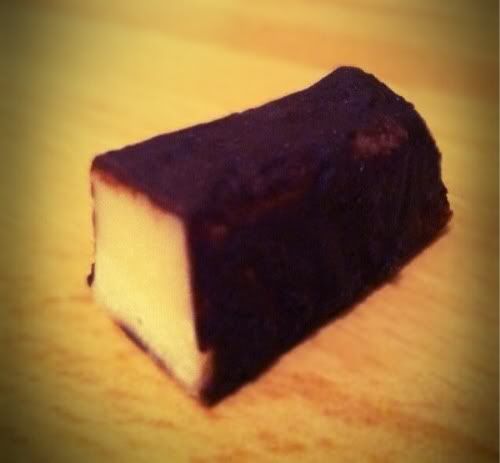
STEP 8 - stir/move your chocolate around in the bowl and you should see that it is beginning to melt. Whilst avoiding the temptation of dipping your face into the bowl take a pastry brush and brush the exterior of your peppermint bars with the melted dark chocolate. I found it best to get a base layer of chocolate on first, then dab the top of the bars so that some chocolate runs down the side coating further.....l was dribbling Iike Homer Simpson on that part!
STEP 9 - when you have happily coated the peppermint bar. If you like you can either apply a little choc to the bottom by picking it up with a cocktail stick or you can freeze what you have and add the bottom chocolate once that has set.
STEP 10 - put the bars back in the freezer/fridge for 10-15 mins until the chocolate has settled and formed a nice coating.
STEP 11 ... Tuck in and have a taste!
As you can see my batch came out pretty well...
Found this a great little recipe. The peppermint gives you a cracking treat rather than something that is made from all nuts or fruit. It brings something a bit different to the table. I ended up cutting my bars into slices, putting them into a freezer bag and have some through the day like a pick n mix treat.
SAMPLE BAGS AVAILABLE FOR THIS RECIPE!
No comments:
Post a Comment